Snyk Integration
Snyk is the platform developers choose to build cloud native applications securely, providing a range of developer-first security products.

Snyk integration is currently in Beta. Please contact support if you'd like to use the integration.
What does Opsgenie offer Snyk users?
Use Opsgenie’s Snyk Integration to forward Snyk issues to Opsgenie whenever it finds any licensing or vulnerability issues. Opsgenie determines the right people to notify based on on-call schedules– notifies via email, text messages (SMS), phone calls, iOS & Android push notifications, and escalates alerts until the alert is acknowledged or closed.
Functionality of the integration
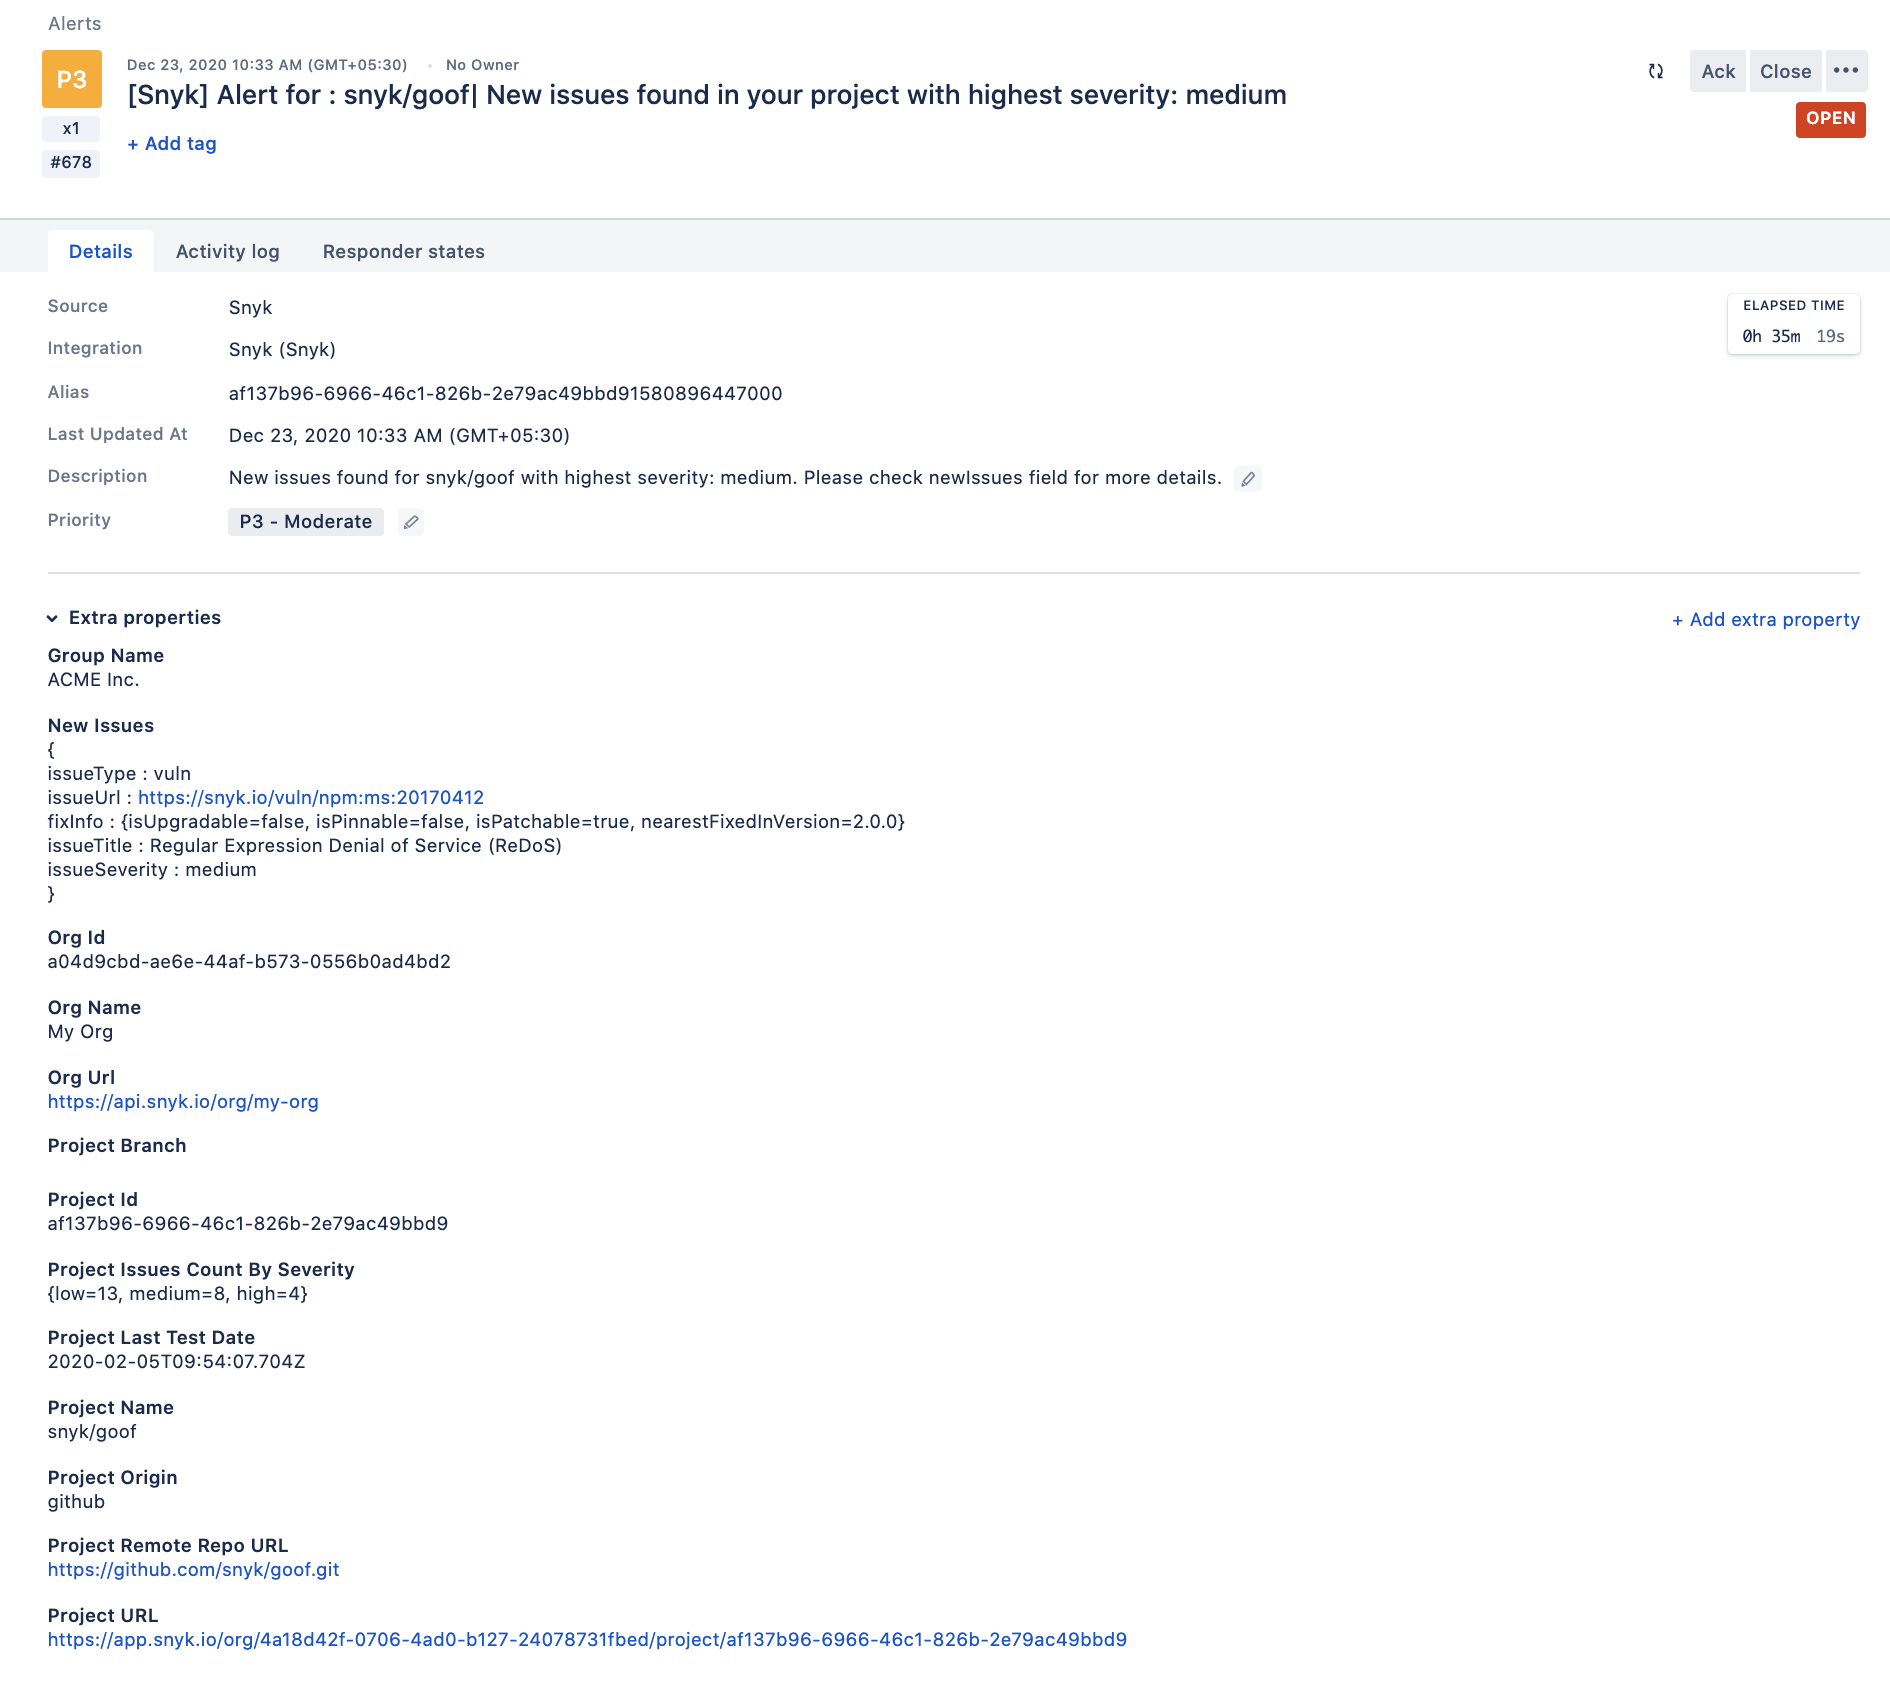
Whenever any project is tested in Snyk and if it finds issues and/or vulnerabilities in the project, a corresponding Opsgenie alert is created with list of all new issues in the project. The priority of the alert is corresponding to the highest severity of the new issues.
Add Snyk Integration in Opsgenie
- Please create an Opsgenie account if you haven't done so already.
- Go to Opsgenie's Snyk Integration page.
For Free and Essentials plans, you can only add the integrations from the Team Dashboards, please use the alternative instructions given below to add this integration.
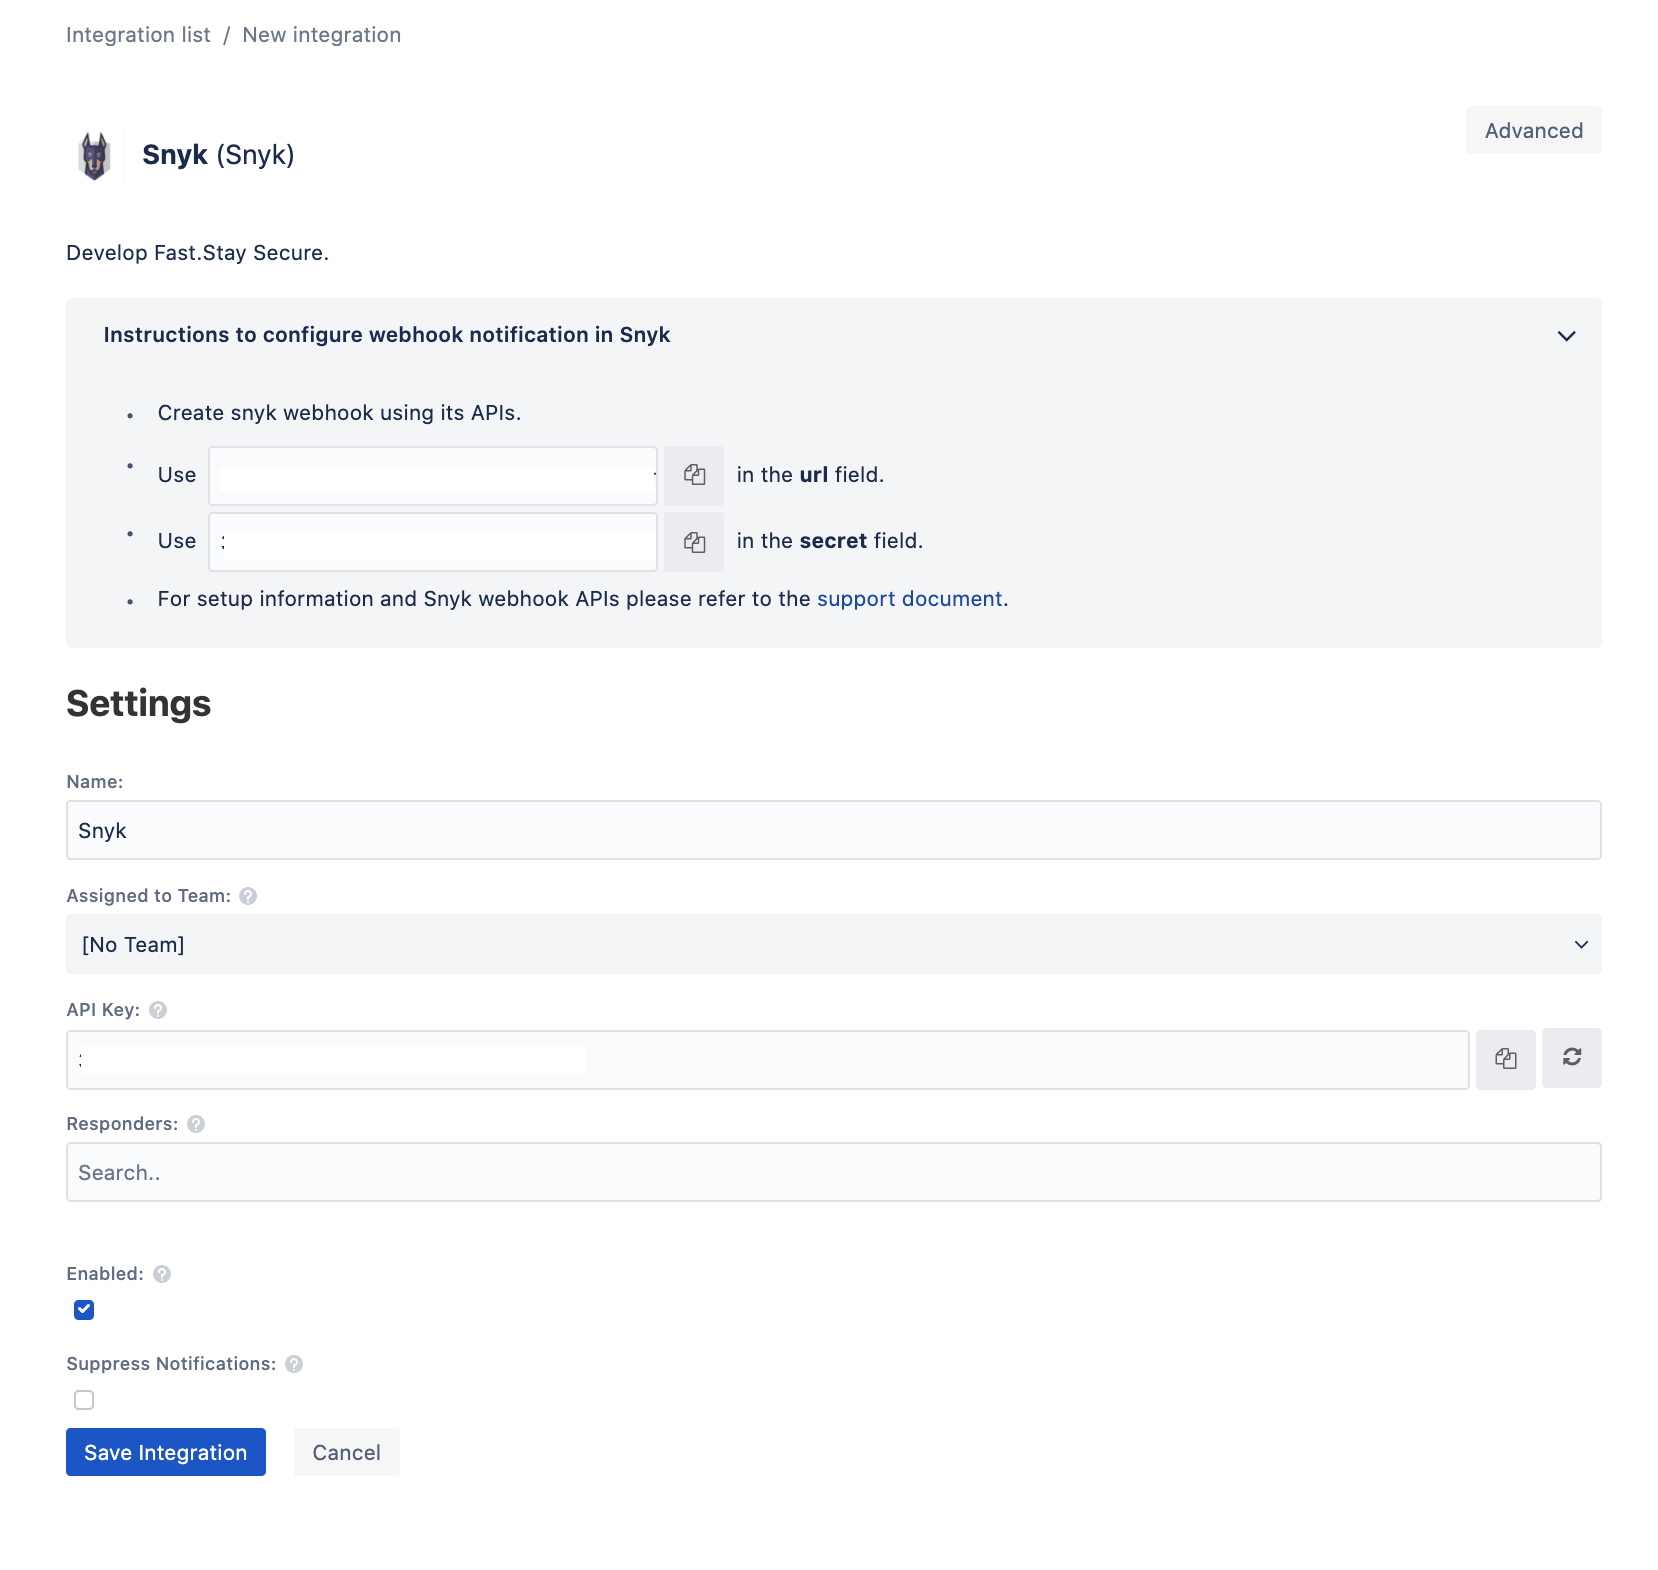
- Specify who should be notified of Snyk notifications using the Responders field. Autocomplete suggestions are provided as you type
An alternative for Step 2) and Step 3) is to add the integration from the Team Dashboard of the team which will own the integration. To add an integration directly to a team, navigate to the Team Dashboard and open Integrations tab. Click Add Integration and select the integration that you would like to add.

- Copy the integration URL which includes Opsgenie's endpoint along with the API key in query parameters. It would be structured as : {{opsgenie URL}}?apiKey={{apiKey}}.
- Click Save Integration
Configuration in Snyk
- Create a webhook in Snyk to receive alerts in Opsgenie. You can use Snyk APIs to create, fetch, ping and delete webhooks for a particular organization.
a. Paste the URL copied from Opsgenie integration page into the URL field of the body.
b. Paste the API key from the Opsgenie integration page into the secret field of the body
POST: https://snyk.io/api/v1/org/{{orgId}}/webhooks

Request body:
{
  "url": "https://my.app.com/webhook-handler/snyk123",
  "secret": "shhh123"
}

Successful response body:
{
  "id": "d3cf26b3-2d77-497b-bce2-23b33cc15362",
  "url": "https://my.app.com/webhook-handler/snyk123",
}
Few points to be noted
- Fetch orgId from: https://app.snyk.io/org/{{orgName}}/manage/settings.
- To use the API to create a webhook in Snyk, you must get your token from Snyk. It can be seen on
https://snyk.io/account/ after you register with Snyk and log in.- The token should be supplied in an Authorization header with the token, preceded by token: Authorization: token API_KEY
- After creating the webhook, you can validate its connectivity by sending a Ping request:
POST: https://snyk.io/api/v1/org/{orgId}/webhooks/{webhookId}/ping- Once the webhooks are configured, Snyk would start sending all events to all the webhooks.
Sample payload sent from Snyk to Opsgenie
{
  "project": {
    "id": "e5342f14-57c3-43a9-a7c6-36060d34d523",
    "name": "test-trabab/dvna:package.json",
    "created": "2020-12-21T09:19:48.252Z",
    "origin": "github",
    "type": "npm",
    "readOnly": false,
    "testFrequency": "daily",
    "totalDependencies": 318,
    "issueCountsBySeverity": {
      "low": 3,
      "high": 13,
      "medium": 6
    },
    "imageTag": "0.0.1",
    "lastTestedDate": "2020-12-21T09:28:13.002Z",
    "browseUrl": "https://app.snyk.io/org/opsgenie/project/e5342f14-57c3-43a9-a7c6-36060d34d523",
    "importingUser": null,
    "owner": null,
    "tags": [],
    "isMonitored": true,
    "attributes": {
      "criticality": [],
      "lifecycle": [],
      "environment": []
    },
    "branch": "master"
  },
  "org": {
    "id": "8952cb0a-6cea-49a6-8246-d9c9e4572937",
    "name": "Opsgenie",
    "slug": "opsgenie",
    "url": "https://app.snyk.io/org/opsgenie",
    "group": null
  },
  "newIssues": [
    {
      "id": "npm:ejs:20161128",
      "issueType": "vuln",
      "pkgName": "ejs",
      "pkgVersions": [
        "0.3.1"
      ],
      "priorityScore": 619,
      "priority": {
        "score": 619,
        "factors": [
          {
            "name": "isFixable",
            "description": "Has a fix available"
          },
          {
            "name": "cvssScore",
            "description": "CVSS 8.1"
          }
        ]
      },
      "issueData": {
        "id": "npm:ejs:20161128",
        "title": "Arbitrary Code Execution",
        "severity": "high",
        "url": "https://snyk.io/vuln/npm:ejs:20161128",
        "description": "## Overview\r\n[`ejs`](https://www.npmjs.com/package/ejs) is a popular JavaScript templating engine.\r\nAffected versions of the package are vulnerable to _Remote Code Execution_ by letting the attacker under certain conditions control the source folder from which the engine renders include files.\r\nYou can read more about this vulnerability on the [Snyk blog](https://snyk.io/blog/fixing-ejs-rce-vuln).\r\n\r\nThere's also a [Cross-site Scripting](https://snyk.io/vuln/npm:ejs:20161130) & [Denial of Service](https://snyk.io/vuln/npm:ejs:20161130-1) vulnerabilities caused by the same behaviour. \r\n\r\n## Details\r\n`ejs` provides a few different options for you to render a template, two being very similar: `ejs.render()` and `ejs.renderFile()`. The only difference being that `render` expects a string to be used for the template and `renderFile` expects a path to a template file.\r\n\r\nBoth functions can be invoked in two ways. The first is calling them with `template`, `data`, and `options`:\r\n```js\r\nejs.render(str, data, options);\r\n\r\nejs.renderFile(filename, data, options, callback)\r\n```\r\nThe second way would be by calling only the `template` and `data`, while `ejs` lets the `options` be passed as part of the `data`:\r\n```js\r\nejs.render(str, dataAndOptions);\r\n\r\nejs.renderFile(filename, dataAndOptions, callback)\r\n```\r\n\r\nIf used with a variable list supplied by the user (e.g. by reading it from the URI with `qs` or equivalent), an attacker can control `ejs` options. This includes the `root` option, which allows changing the project root for includes with an absolute path.  \r\n\r\n```js\r\nejs.renderFile('my-template', {root:'/bad/root/'}, callback);\r\n```\r\n\r\nBy passing along the root directive in the line above, any includes would now be pulled from `/bad/root` instead of the path intended. This allows the attacker to take control of the root directory for included scripts and divert it to a library under his control, thus leading to remote code execution.\r\n\r\nThe [fix](https://github.com/mde/ejs/commit/3d447c5a335844b25faec04b1132dbc721f9c8f6) introduced in version `2.5.3` blacklisted `root` options from options passed via the `data` object.\r\n\r\n## Disclosure Timeline\r\n- November 27th, 2016 - Reported the issue to package owner.\r\n- November 27th, 2016 - Issue acknowledged by package owner.\r\n- November 28th, 2016 - Issue fixed and version `2.5.3` released.\r\n\r\n## Remediation\r\nThe vulnerability can be resolved by either using the GitHub integration to [generate a pull-request](https://snyk.io/org/projects) from your dashboard or by running `snyk wizard` from the command-line interface.\r\nOtherwise, Upgrade `ejs` to version `2.5.3` or higher.\r\n\r\n## References\r\n- [Snyk Blog](https://snyk.io/blog/fixing-ejs-rce-vuln)\r\n- [Fix commit](https://github.com/mde/ejs/commit/3d447c5a335844b25faec04b1132dbc721f9c8f6)",
        "identifiers": {
          "ALTERNATIVE": [
            "SNYK-JS-EJS-10218"
          ],
          "CVE": [
            "CVE-2017-1000228"
          ],
          "CWE": [
            "CWE-94"
          ]
        },
        "credit": [
          "Snyk Security Research Team"
        ],
        "exploitMaturity": "no-known-exploit",
        "semver": {
          "vulnerable": [
            "<2.5.3"
          ]
        },
        "publicationTime": "2016-11-28T18:44:12Z",
        "disclosureTime": "2016-11-27T22:00:00Z",
        "CVSSv3": "CVSS:3.1/AV:N/AC:H/PR:N/UI:N/S:U/C:H/I:H/A:H",
        "cvssScore": 8.1,
        "functions": [
          {
            "functionId": {
              "filePath": "ejs.js",
              "functionName": "1.exports.render"
            },
            "version": [
              "<2.2.1"
            ]
          },
          {
            "functionId": {
              "filePath": "lib/ejs.js",
              "functionName": "exports.render"
            },
            "version": [
              "<2.2.1"
            ]
          },
          {
            "functionId": {
              "filePath": "ejs.js",
              "functionName": "1.cpOptsInData"
            },
            "version": [
              ">=2.2.1 <2.5.3"
            ]
          },
          {
            "functionId": {
              "filePath": "lib/ejs.js",
              "functionName": "cpOptsInData"
            },
            "version": [
              ">=2.2.1 <2.5.3"
            ]
          }
        ],
        "language": "js",
        "patches": [
          {
            "comments": [],
            "id": "patch:npm:ejs:20161128:0",
            "modificationTime": "2019-12-03T11:40:45.851976Z",
            "urls": [
              "https://snyk-patches.s3.amazonaws.com/npm/ejs/20161128/ejs_20161128_0_0_3d447c5a335844b25faec04b1132dbc721f9c8f6.patch"
            ],
            "version": "<2.5.3 >=2.2.4"
          }
        ],
        "nearestFixedInVersion": ""
      },
      "isPatched": false,
      "isIgnored": false,
      "fixInfo": {
        "isUpgradable": true,
        "isPinnable": false,
        "isPatchable": false,
        "isPartiallyFixable": true,
        "nearestFixedInVersion": ""
      }
    }
  ]
}
Sample alert in Opsgenie

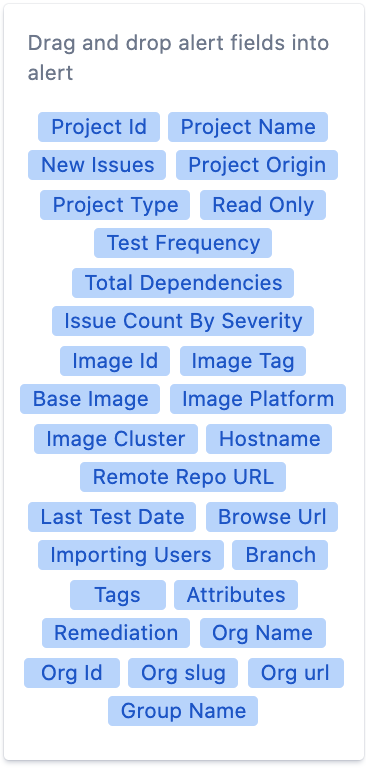
Fields parsed by Opsgenie

Updated 8 months ago
