Oracle Enterprise Manager Integration
Oracle Enterprise Manager is a set of systems management tools provided by Oracle Corporation for managing the Oracle environment. It provides tools to monitor the Oracle environment and automate tasks to make database and application administration easier.

What does Opsgenie offer OEM users?
Use Opsgenie's OEM Integration to forward OEM alerts to Opsgenie. Opsgenie determines the right people to notify based on on-call schedules– notifies via email, text messages (SMS), phone calls, and iPhone & Android push notifications, and escalates alerts until the alert is acknowledged or closed.
Functionality of the integration
- When an incident is created in Oracle Enterprise Manager, an alert is created in Opsgenie automatically through the integration.
Add Oracle Enterprise Manager Integration in Opsgenie
- Please create an Opsgenie account if you haven't done so already.
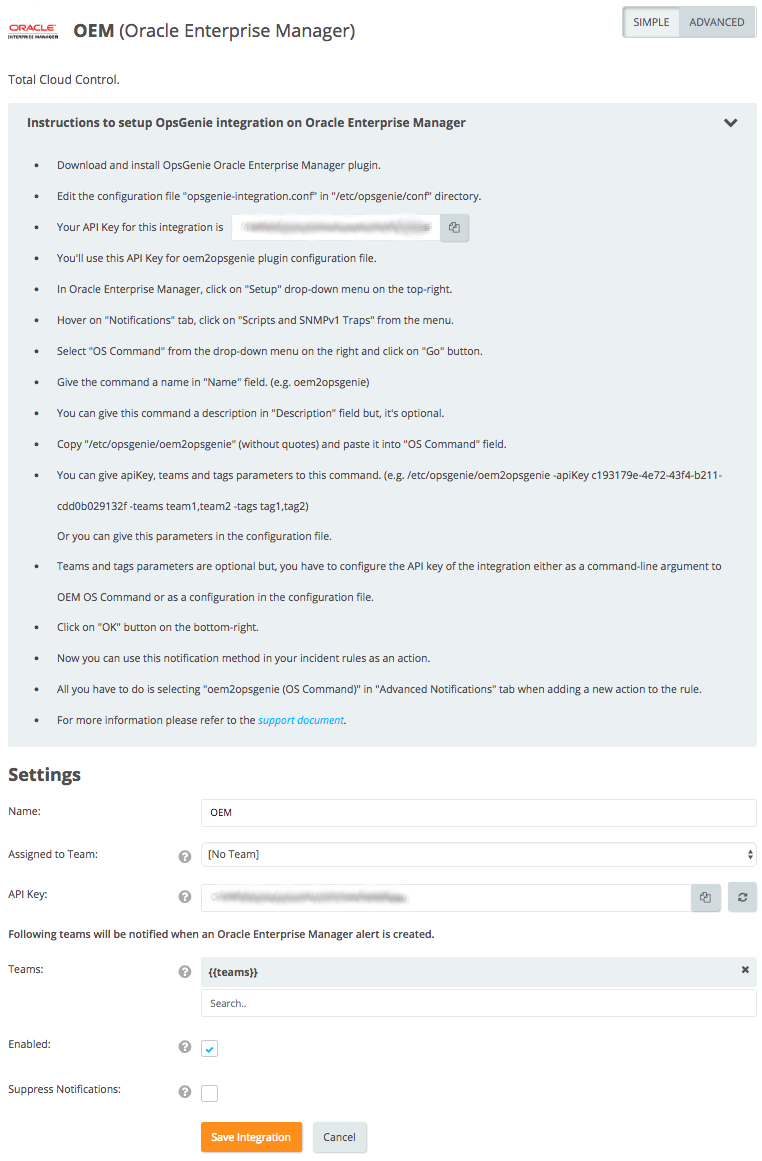
- Go to Opsgenie Oracle Enterprise Manager Integration page.
For Free and Essentials plans, you can only add the integrations from the Team Dashboards, please use the alternative instructions given below to add this integration.
- Specify who is notified of Oracle Enterprise Manager alerts using the Teams field. Auto-complete suggestions are provided as you type.
An alternative for Step 2) and Step 3) is to add the integration from the Team Dashboard of the team which will own the integration. To add an integration directly to a team, navigate to the Team Dashboard and open Integrations tab. Click Add Integration and select the integration that you would like to add.
- Click Save Integration.

Opsgenie Oracle Enterprise Manager Plugin
For Red Hat Based Distributions
- Download Opsgenie Oracle Enterprise Manager plugin.
- Run following command:
sudo rpm -i opsgenie-oem-<your_version>.rpmFor Debian Based Distributions
- Download Opsgenie Oracle Enterprise Manager plugin.
- Run the following command:
sudo dpkg -i opsgenie-oem-<your_version>.debSteps After Downloading the Plugin
- After installation, retrieve the configuration file for the plugin (opsgenie-integration.conf) located in "/etc/opsgenie/conf".
- Edit this file and put the API Key for OEM integration in "apiKey" key replacing "<your_opsgenie_integrarion_api_key>".
- Save the configuration file.

Configuration Parameters | |
|---|---|
apiKey | Copy the API key from the Oracle Enterprise Manager integration created above. oem2opsgenie uses this key to authenticate to Opsgenie. API key is also used to identify the right integration configuration that should be used to process alerts. |
teams | Teams field is used to specify which teams should be notified for the Oracle Enterprise Manager alerts. This field is used to set the default teams field value. It can be modified to route different alerts to different teams in Opsgenie Oracle Enterprise Manager integration, Advanced Settings page. |
tags | Tags field is used to specify the tags of the alert that created in Opsgenie. |
logPath | Specifies the full path of the log file. (Default value is /var/log/opsgenie/oem2opsgenie.log) |
oem2opsgenie.http.proxy.enabled | oem2opsgenie.http.proxy.enabled field is to enable/disable external proxy configuration. The default value is false. |
oem2opsgenie.http.proxy.host | It is the port of the proxy. |
oem2opsgenie.http.proxy.port | It is the port of the proxy. |
oem2opsgenie.http.proxy.scheme | It is the proxy connection protocol. It may be http or https depending on your proxy servers. Its default value is http. |
oem2opsgenie.http.proxy.username | It is the Proxy authentication username. |
oem2opsgenie.http.proxy.password | It is the Proxy authentication password. |
opsgenie.api.url | If you're using Opsgenie from another domain(eg. EU, sandbox), you should update this configuration. |
To send additional custom arguments, add them after the flags as: customArgName1 customArgValue1 customArgName2 customArgValue2
Parse custom arguments by adding {{_payload.customArgName}} to whereveris needed in the input fields.
For more information about using raw parameters please visit Dynamic Fields document.
Configure the golang-executable to use a proxy for sending HTTP requests by defining the environment variable HTTP_PROXY=http://host:port
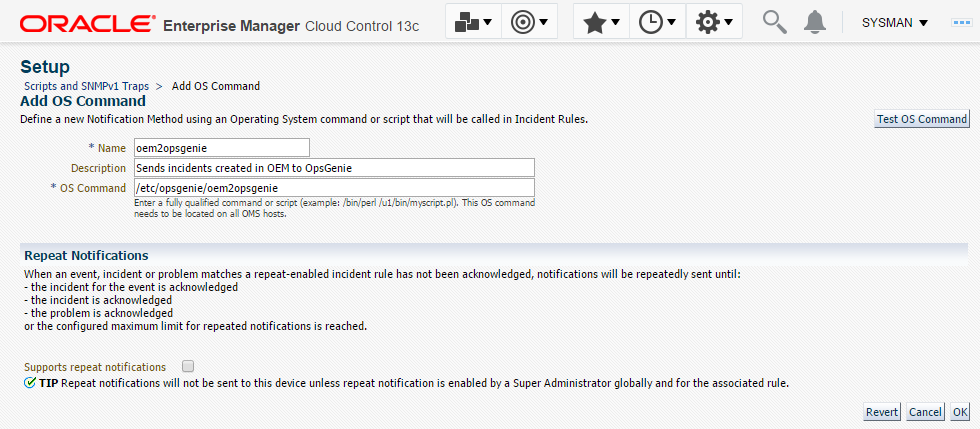
Configuration in Oracle Enterprise Manager
- In Oracle Enterprise Manager, click Setup from the drop-down menu on the top-right.
- Hover on the "Notifications" tab, then click Scripts and SNMPv1 Traps from the menu.
- Select "OS Command" from the drop-down menu on the right and click Go.
- Give the command a name in "Name" field. (e.g. oem2opsgenie)
- Optionally, give this command a description in the "Description" field.
- Copy and paste it into "OS Command" field.
/etc/opsgenie/oem2opsgenie- Give apiKey, teams, and tags parameters to this command. (e.g. /etc/opsgenie/oem2opsgenie -apiKey c193179e-4e72-43f4-b211-cdd0b029132f -teams "team1,team2" -tags "tag1,tag2")
Or give these parameters in the configuration file. - If using command-line parameters, the same parameter is overwritten from the configuration file.
- Teams and tags parameters are optional but it is necessary to configure the API key of the integration either as a command-line argument to OEM OS command or as a configuration in the configuration file.
- Click OK on the bottom-right.
- Now use this notification method in your incident rules as an action.
- Select "oem2opsgenie (OS Command)" in "Advanced Notifications" tab when adding a new action to the rule.

Sample Webhook Message from Opsgenie OEM Plugin
{
            "ASSOC_EVENT_COUNT": "1",
            "CATEGORIES_COUNT": "1",
            "CATEGORY_1": "Capacity",
            "CATEGORY_CODES_COUNT": "1",
            "CATEGORY_CODE_1": "Capacity",
            "ESCALATED": "No",
            "ESCALATED_LEVEL": "0",
            "EVENT_SOURCE_1_HOST_NAME": "WIN-NAMD8F7JLL1",
            "EVENT_SOURCE_1_TARGET_GUID": "A0D26BACFF431D97FF36B90D82811004",
            "EVENT_SOURCE_1_TARGET_NAME": "WIN-NAMD8F7JLL1",
            "EVENT_SOURCE_1_TARGET_OWNER": "SYSMAN",
            "EVENT_SOURCE_1_TARGET_TYPE": "host",
            "EVENT_SOURCE_1_TARGET_URL": "https://WIN-NAMD8F7JLL1:7799/em/redirect?pageType",
            "EVENT_SOURCE_1_TARGET_VERSION": "6.3.9600.0.0",
            "EVENT_SOURCE_2_HOST_NAME": "WIN-NAMD8F7JLL2",
            "EVENT_SOURCE_2_TARGET_GUID": "A0D26BACFF431D97FF36B90D82811005",
            "EVENT_SOURCE_2_TARGET_NAME": "WIN-NAMD8F7JLL2",
            "EVENT_SOURCE_2_TARGET_OWNER": "SYSMAN2",
            "EVENT_SOURCE_2_TARGET_TYPE": "host2",
            "EVENT_SOURCE_2_TARGET_URL": "https://WIN-NAMD8F7JLL1:7799/em/redirect?pageType2",
            "EVENT_SOURCE_2_TARGET_VERSION": "6.3.9600.0.2",
            "EVENT_SOURCE_COUNT": "2",
            "INCIDENT_ACKNOWLEDGED_BY_OWNER": "No",
            "INCIDENT_CREATION_TIME": "Oct 10, 2016 7:26:50 AM GMT",
            "INCIDENT_ID": "30",
            "INCIDENT_STATUS": "New",
            "ISSUE_TYPE": "2",
            "LAST_UPDATED_TIME": "Oct 10, 2016 7:26:50 AM GMT",
            "MESSAGE": "CPU Utilization is 12.746%, crossed warning (2) or critical (10) threshold.",
            "MESSAGE_URL": "https://WIN-NAMD8F7JLL1:7799/em/redirect?pageType",
            "NOTIF_TYPE": "NOTIF_NORMAL",
            "ORCL_GTP_OS": "Windows",
            "ORCL_GTP_PLATFORM": "x64 (AMD or Intel)",
            "PRIORITY": "None",
            "PRIORITY_CODE": "PRIORITY_NONE",
            "REPEAT_COUNT": "0",
            "RULESET_NAME": "Prod Rule Set",
            "RULE_NAME": "Prod Rule Set,rule 132",
            "RULE_OWNER": "SYSMAN",
            "SEVERITY": "Critical",
            "SEVERITY_CODE": "CRITICAL",
            "SEVERITY_SHORT": "CR",
            "SystemRoot": "C:\\Windows",
            "UPDATES": "Incident created by rule (Name ",
            "UPDATES_1": "Incident created by rule (Name ",
            "UPDATES_COUNT": "1",
            "USER_DEFINED_TARGET_PROP": "Operating System",
            "apiKey": "1234-abcd-5678-efgh",
            "tags": "tag1,tag2",
            "teams": "team1,team2"
}
Sample alert

Updated 6 months ago
