Cherwell Integration
Cherwell empowers organizations to transform their business through the rapid adoption and easy management of digital services. Cherwell’s adaptable platform has enabled thousands of organizations to modernize their business operations with customizable service management, automation, and reporting across the enterprise. For more information, visit http://www.cherwell.com.

What does OpsGenie offer to Cherwell users?
OpsGenie provides a powerful two-way integration with Cherwell. Use the integration to send Cherwell incidents to OpsGenie's API with detailed information. OpsGenie acts as a dispatcher for Cherwell alerts, determines the right people to notify based on on-call schedules– notifies via email, text messages (SMS), phone calls and iOS & Android push notifications, and escalates alerts until the alert is acknowledged or closed.
Functionality of the integration
- When the status of incident is New or Reopened in Cherwell, an alert is created in OpsGenie automatically through the integration.
- When the status of incident is In Progress in Cherwell, the alert that is created in OpsGenie is acknowledged automatically.
- When the status of incident is Resolved or Closed in Cherwell, the alert that is created in OpsGenie is closed automatically.
- If Send Alert Updates Back to Cherwell is enabled, incident actions are executed in Cherwell when the chosen action is executed in OpsGenie for Cherwell alerts.
- If Create Cherwell Incidents for OpsGenie Alerts is enabled, incident actions are executed in Cherwell when the chosen action is executed in OpsGenie for alerts from a different source than Cherwell.
Add Cherwell Integration in OpsGenie
- Please create an OpsGenie account if you haven't done so already.
- Go to OpsGenie Cherwell Integration page.
- Specify who is notified of Cherwell alerts using the Teams field. Auto-complete suggestions are provided as you type.
- Copy the API key.
- Click Save Integration.
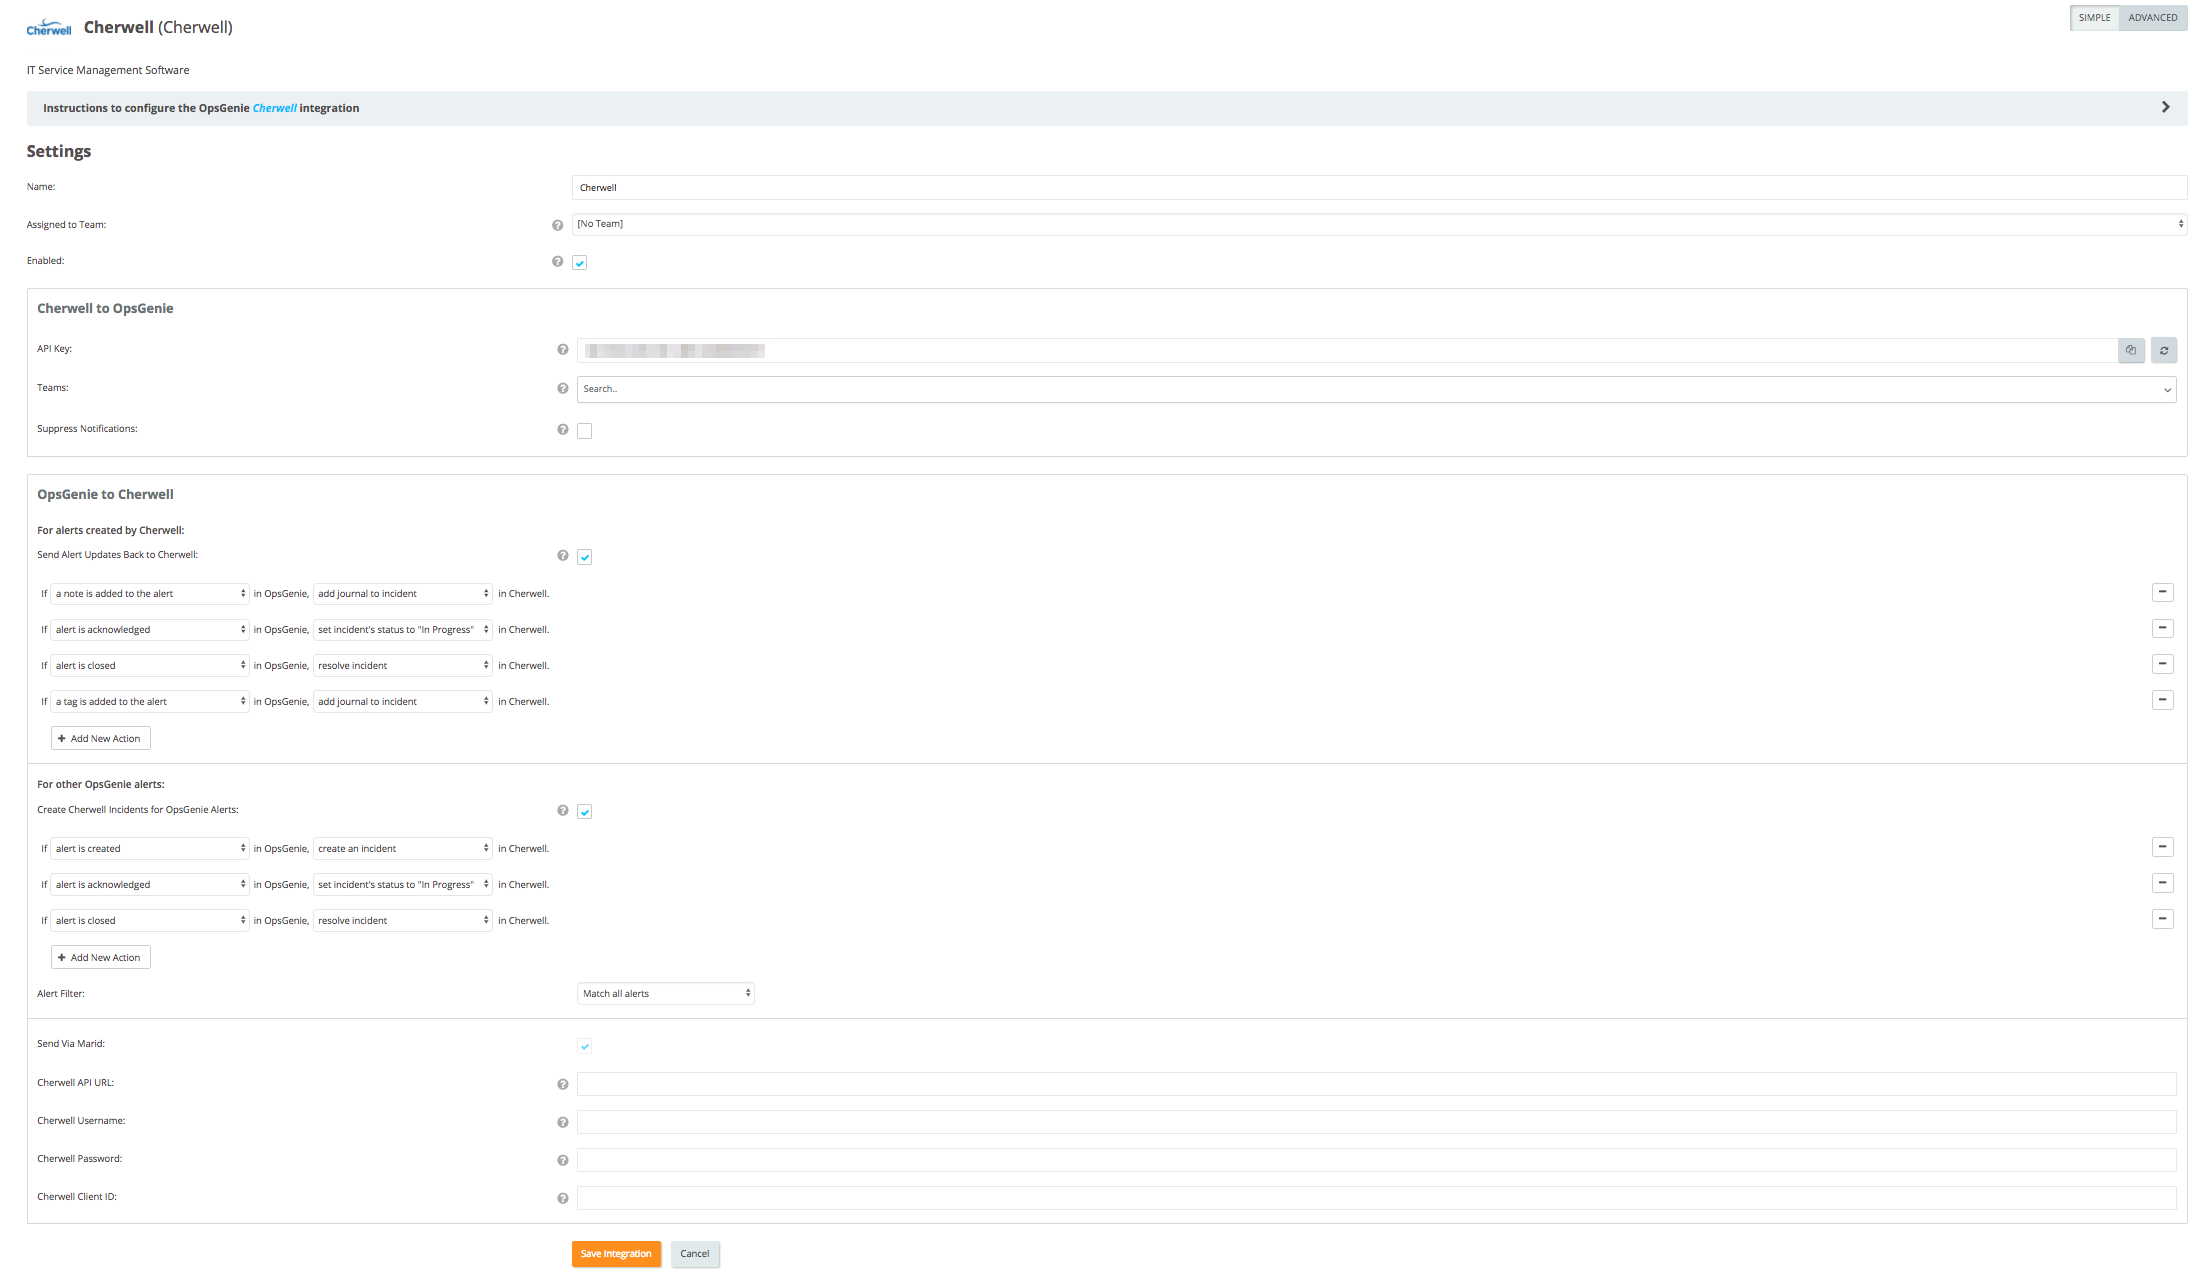
Marid is required for sending data to Cherwell from OpsGenie.
Configuration in Cherwell
- Download the integration blueprint, opsgenie.bp.
- In Cherwell Service Management Administrator, open opsgenie.bp and publish the blueprint.
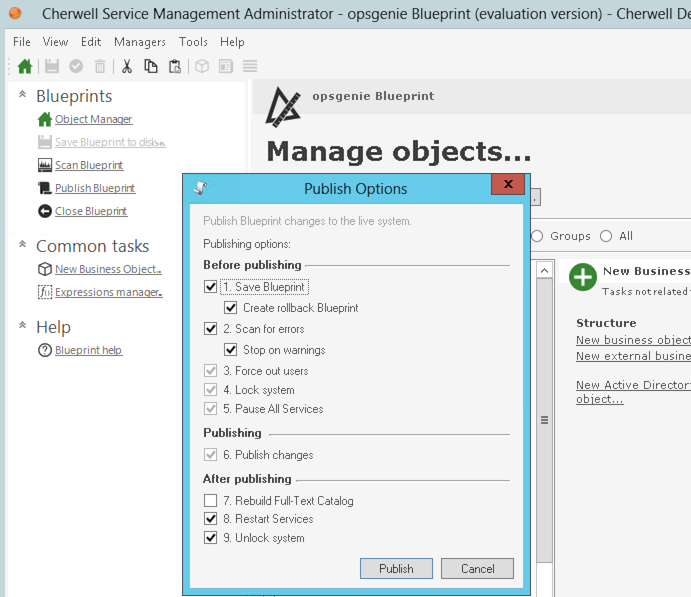
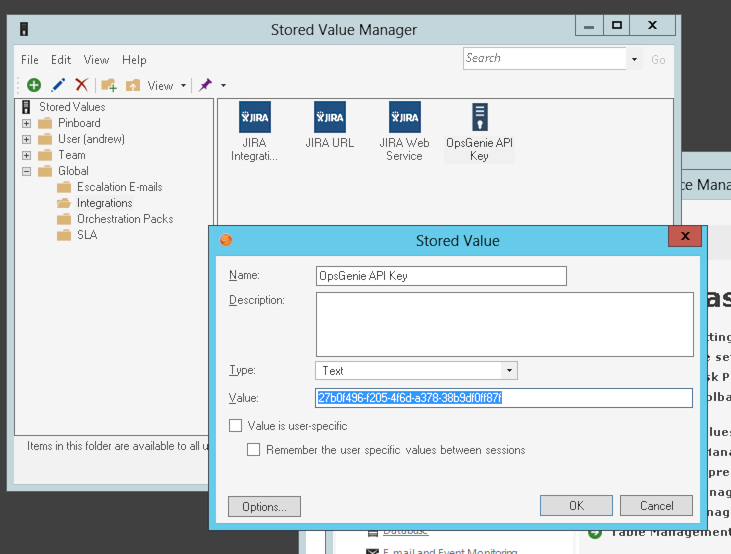
- Open Stored Values Manager, and locate "OpsGenie API Key" under Global/Integrations. Paste the API key you copied as its value. You can refer here about updating Stored Values.
All done! Forward your Cherwell incidents to OpsGenie and leverage OpsGenie's full alerting functionality.
Using Cherwell Integration on OpsGenie EU Service Region
If using OpsGenie's dedicated European Service Region, a slight modification is needed for the OpsGenie Web Service
- In Cherwell Service Management Administrator, open Browser and Mobile Settings
- Click on the Web Services Manager
- Find OpsGenie Webhook in the list, then right-click and select edit to modify it.
- Change the URL field from
https://api.opsgenie.com/v1/json/cherwelltohttps://api.eu.opsgenie.com/v1/json/cherwell
Required modifications in Cherwell for Marid integration
Before setting up the Integration via Marid follow the steps below for a hassle-free experience.
Obtaining REST API Client ID
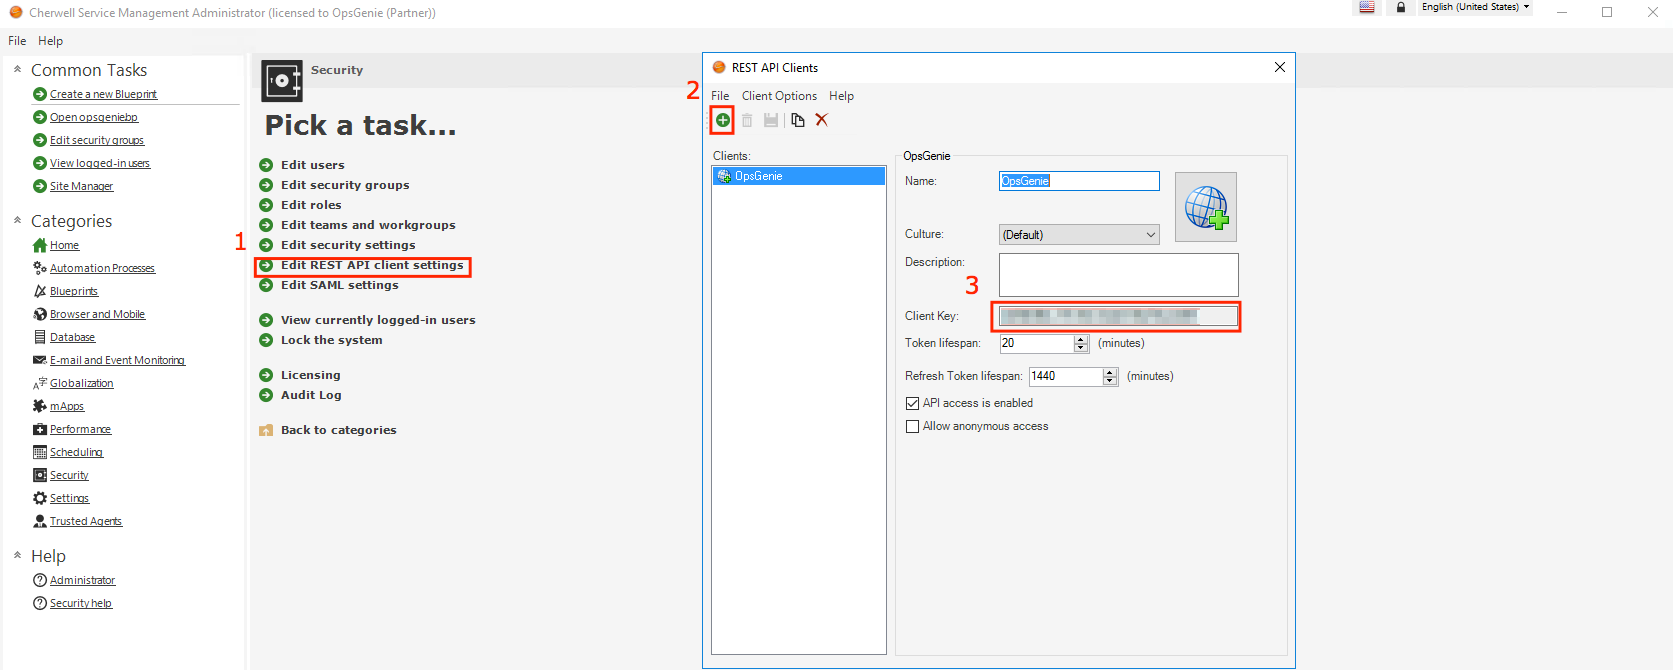
- In Cherwell Service Management Administrator, open Security.
- Click Edit REST API Client Settings.
- Click on the plus sign to create a new entry.
- Name the REST API client as OpsGenie and copy the client id.
- Click on the floppy disk icon to save.
Creating a user for Marid Integration
Create a Cherwell User for Marid Integration to authenticate in Cherwell.
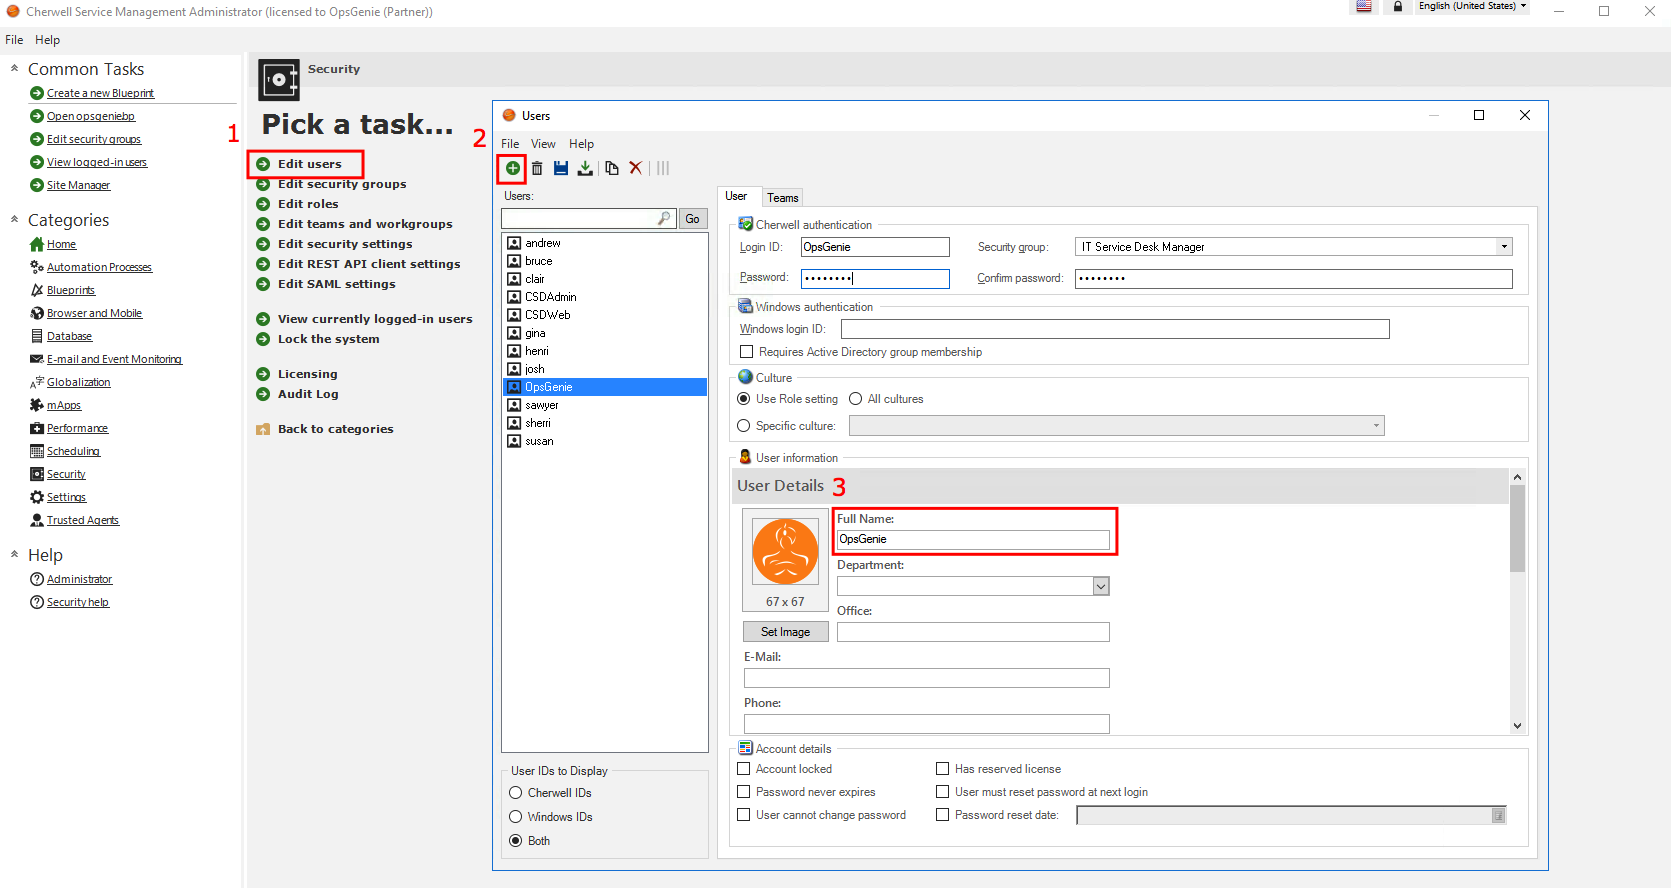
- In Cherwell Service Management Administrator, open Security.
- Click Edit Users.
- Click on the plus sign to create a new entry.
- Provide Cherwell authentication credentials for this user.
- Set the Full Name of the user to OpsGenie, the field is case-sensitive.
- Image is optional.
- Click on the floppy disk icon to save.
Creating a customer for Marid Integration
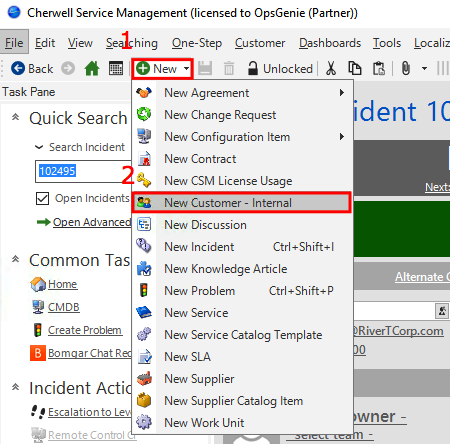
Create a Cherwell Customer for Marid integration which will be used as the requestor of the incidents created by OpsGenie.
- In Cherwell Service Management, click on New -> New Customer - Internal.
- Set the Full Name of the customer to OpsGenie, the field is case-sensitive.
- Image is optional.
- Click on the floppy disk icon to save.

Integration via Marid
Use OpsGenie's Cherwell Integration package to create / update incidents on Cherwell. This enables you to deploy your own scripts / modify the ones provided and execute customized actions on Cherwell.
To use Cherwell integration package, follow the steps in the sections below through the end.
- Download OpsGenie Cherwell Integration Package
- Extract the .zip package and move the extracted folder named OpsGenie to the path **C:**
- Cherwell Integration package contains Marid package in a directory named opsgenie-integration.
- C:\OpsGenie\CherwellIntegration\opsgenie-integration\marid will be referred as MARID_HOME in the rest of documentation.)
- To install Marid as a service:
- Open Command Prompt
- Go to <MARID_HOME> directory
For 32 bit systems:marid.exe -install
 For 64 bit systems:marid_64.exe -install
Name of the service will be assigned to "OpsGenie Marid"
To set JAVA_HOME environment variable, refer to Setting JAVA_HOME for more information.
To enable Ruby scripting, you need to download JRuby Complete jar file and put this jar file in lib directory (/var/lib/opsgenie/marid On Linux, MARID_HOME/lib on Windows systems.).
You may need to restart your system after setting JAVA_HOME environment variable for Windows XP/2000/2003 operating systems due to problem reported at http://support.microsoft.com/kb/821761
Configuring Cherwell Integration for Marid
If you are using Opsgenie Edge Connector instead of Marid, you can find the integration specific script and its sample config from here. For more information about OEC, please refer OEC Integration documentation
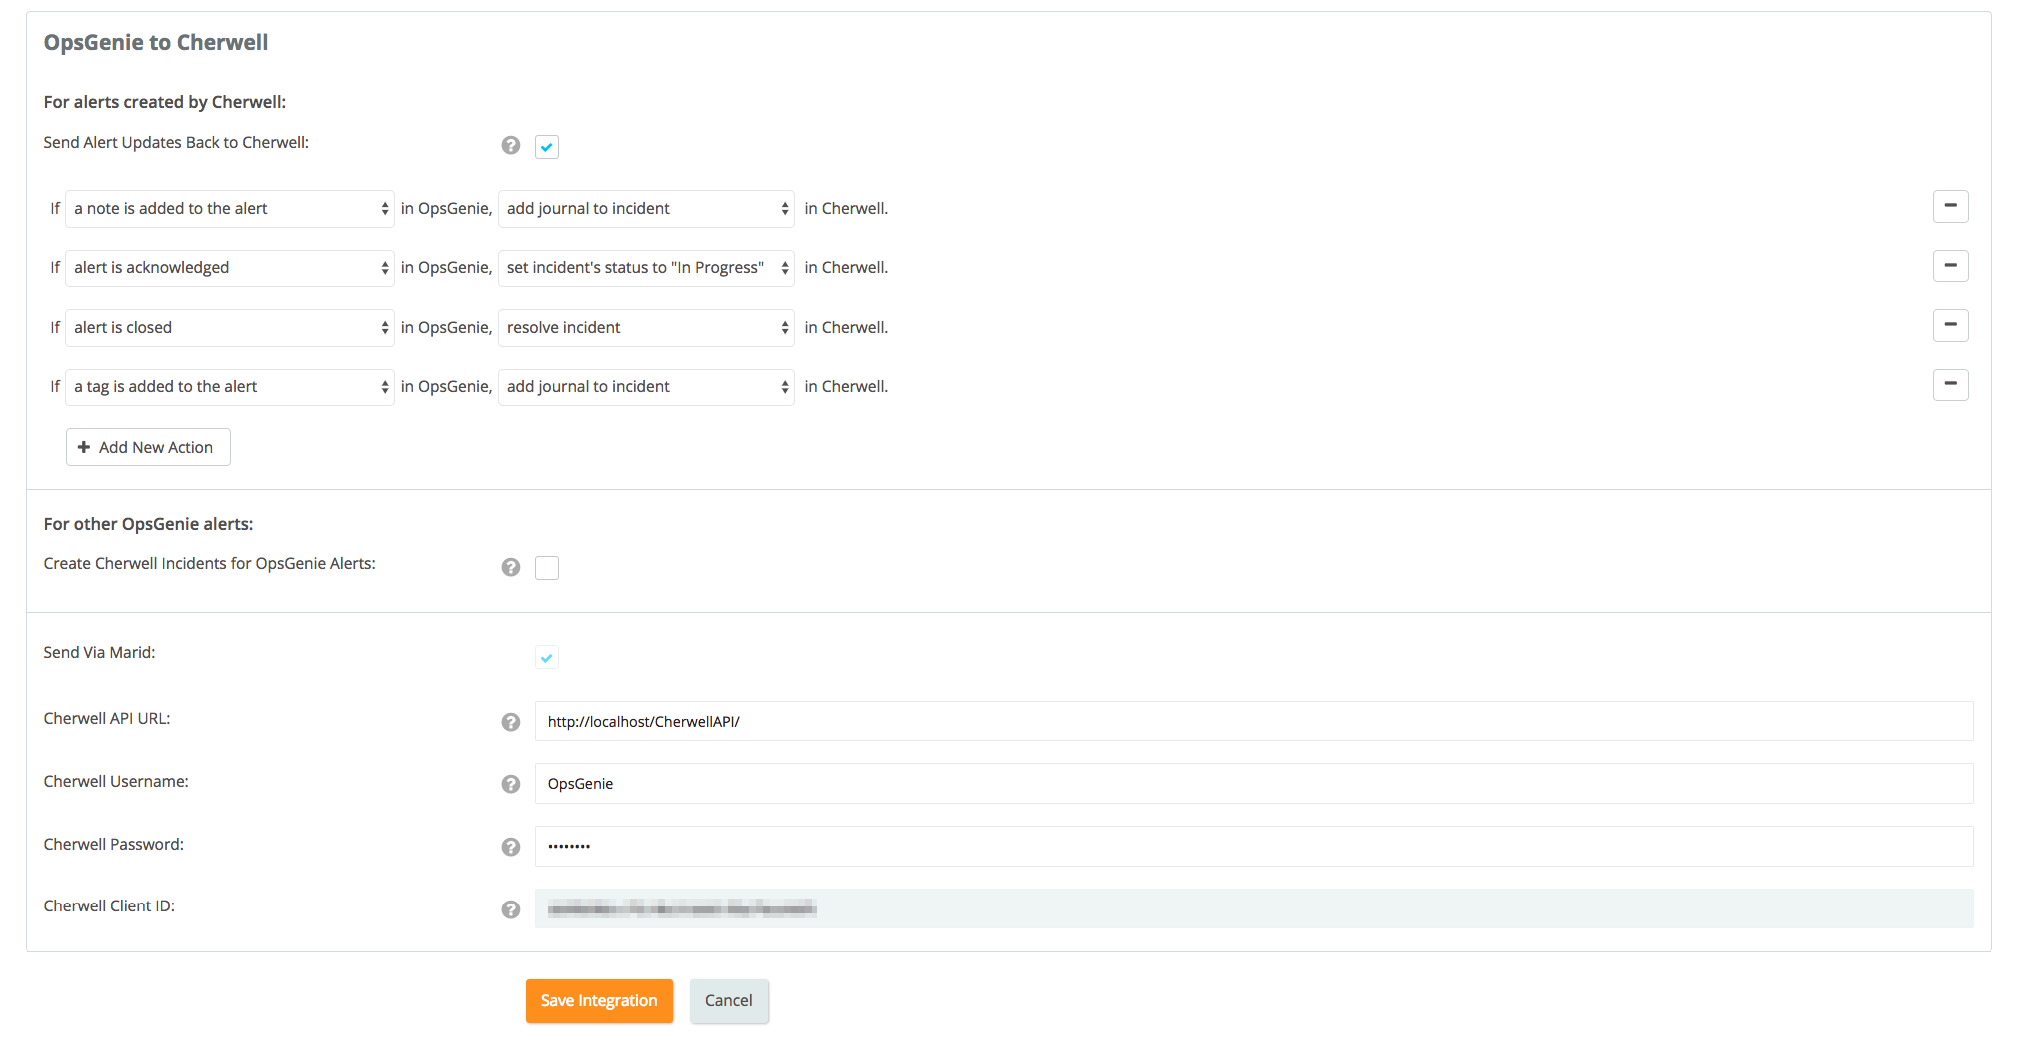
- Configurations regarding Cherwell can be done either via integration page or Marid configuration file opsgenie-integration.conf. Configuration in integration page will precede the configuration file.
Marid Configuration
The integration uses Marid utility (included in the package) to create / update incidents on Cherwell when alerts are updated.
To start Marid, Open Command Prompt
- Go to <MARID_HOME> directory and run the following command.
- For 32 bit systems:
marid.exe -start - For 64 bit systems:
marid_64.exe -start
To stop Marid, run the following command:
- For 32 bit systems:
marid.exe -stop - For 64 bit systems:
marid_64.exe -stop
If Cherwell credentials weren't set via integration page, to be able to execute actions on Cherwell, Marid gets the configuration parameters from C:\OpsGenie\CherwellIntegration\opsgenie-integration\conf file. Please note that apiKey field in the opsgenie-integration.conf file must be filled.
Configuration Parameter | Description |
|---|---|
apiKey | Copy the API key from the Cherwell integration you've created above |
cherwell.apiUrl | URL of your Cherwell API. For example: http://localhost/CherwellAPI/ |
cherwell.username | The username you used to sign in to Cherwell |
cherwell.password | The password you used to sign in to Cherwell |
cherwell.clientId | The clientId which you've obtained in the chapter Required Modifications in Cherwell for Marid Integration |
opsgenie.api.url | If you're using OpsGenie from another domain(eg. EU, sandbox), you should update this configuration. |
According to the action that will be executed in Cherwell, the script to be run can be set here. OpsGenie's script is set by default; you can change the following configuration to run your own custom script if you like.
Action Mapping | Script File |
|---|---|
mappedActions.addJournal.script | cherwellActionExecutor.groovy |
mappedActions.createIncident.script | cherwellActionExecutor.groovy |
mappedActions.resolveIncident.script | cherwellActionExecutor.groovy |
mappedActions.inProgressIncident.script | cherwellActionExecutor.groovy |
After all is set, according to your action mappings incidents will be created / updated in Cherwell.
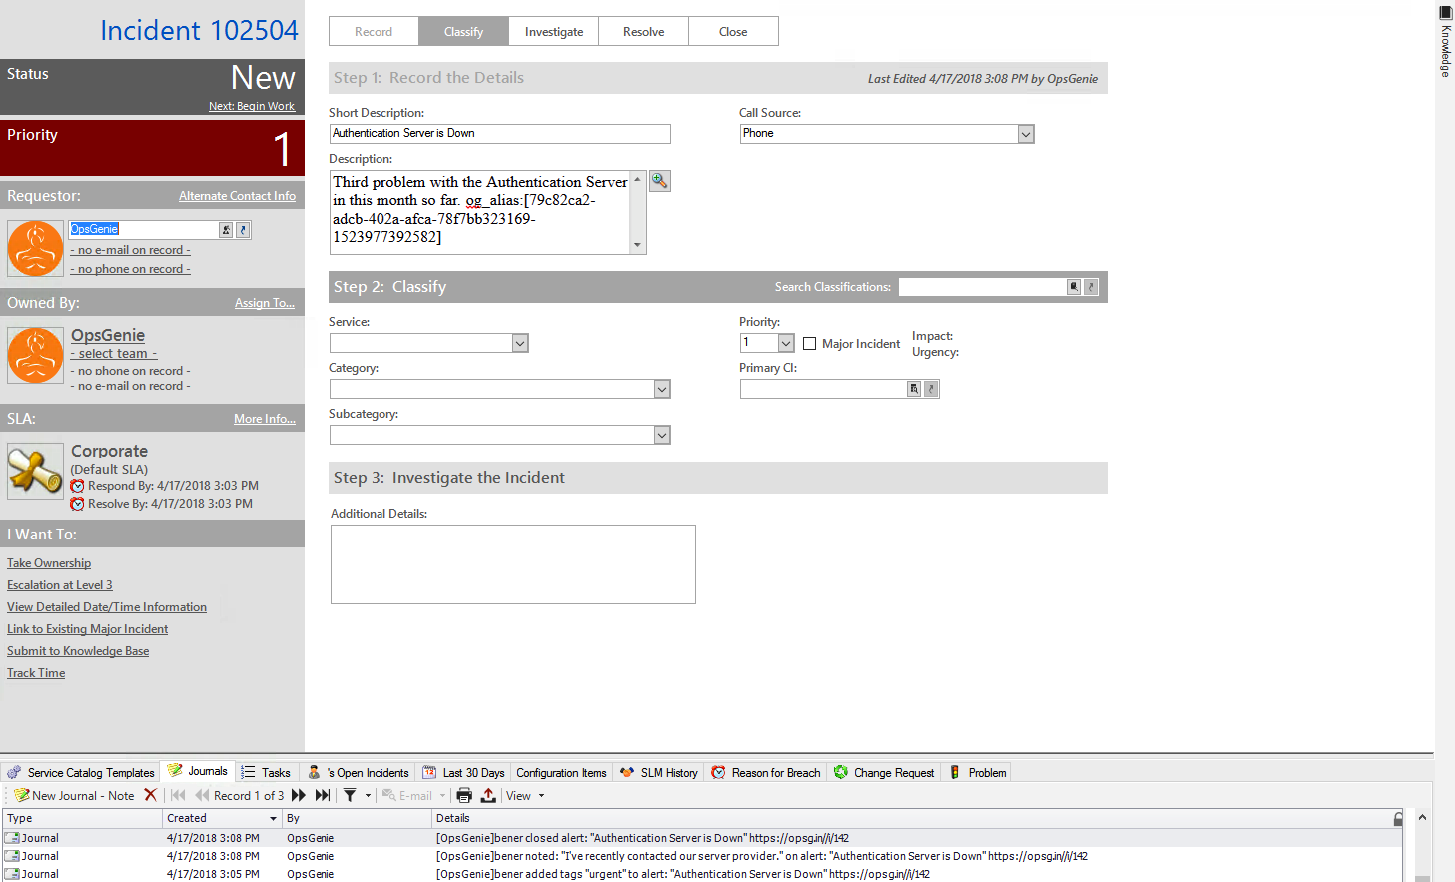
Sample payload sent from Cherwell to OpsGenie
{
    "incident" : {
       "callSource" : "Walk in",
       "status" : "Reopened",
       "shortDescription" : "Printer Issue",
       "category" : "Network",
       "cause" : "Hardware Malfunction",
       "id" : "102256",
       "description" : "Having trouble with the network printer",
       "type" : "Incident",
       "priority" : "3",
       "service" : "Printing",
       "subcategory" : "Submit Incident",
       "isMajorIncident" : "FALSE",
       "isRecurringIncident" : "FALSE"
    }
}
This payload is parsed by OpsGenie as:
[
    "call_source" : "Walk in",
    "status" : "Reopened",
    "short_description" : "Printer Issue",
    "category" : "Network",
    "cause" : "Hardware Malfunction",
    "incident_id" : "102256",
    "description" : "Having trouble with the network printer",
    "type" : "Incident",
    "priority" : "3",
    "service" : "Printing",
    "subcategory" : "Submit Incident",
    "is_major_incident" : false,
    "is_recurring_incident" : false
]
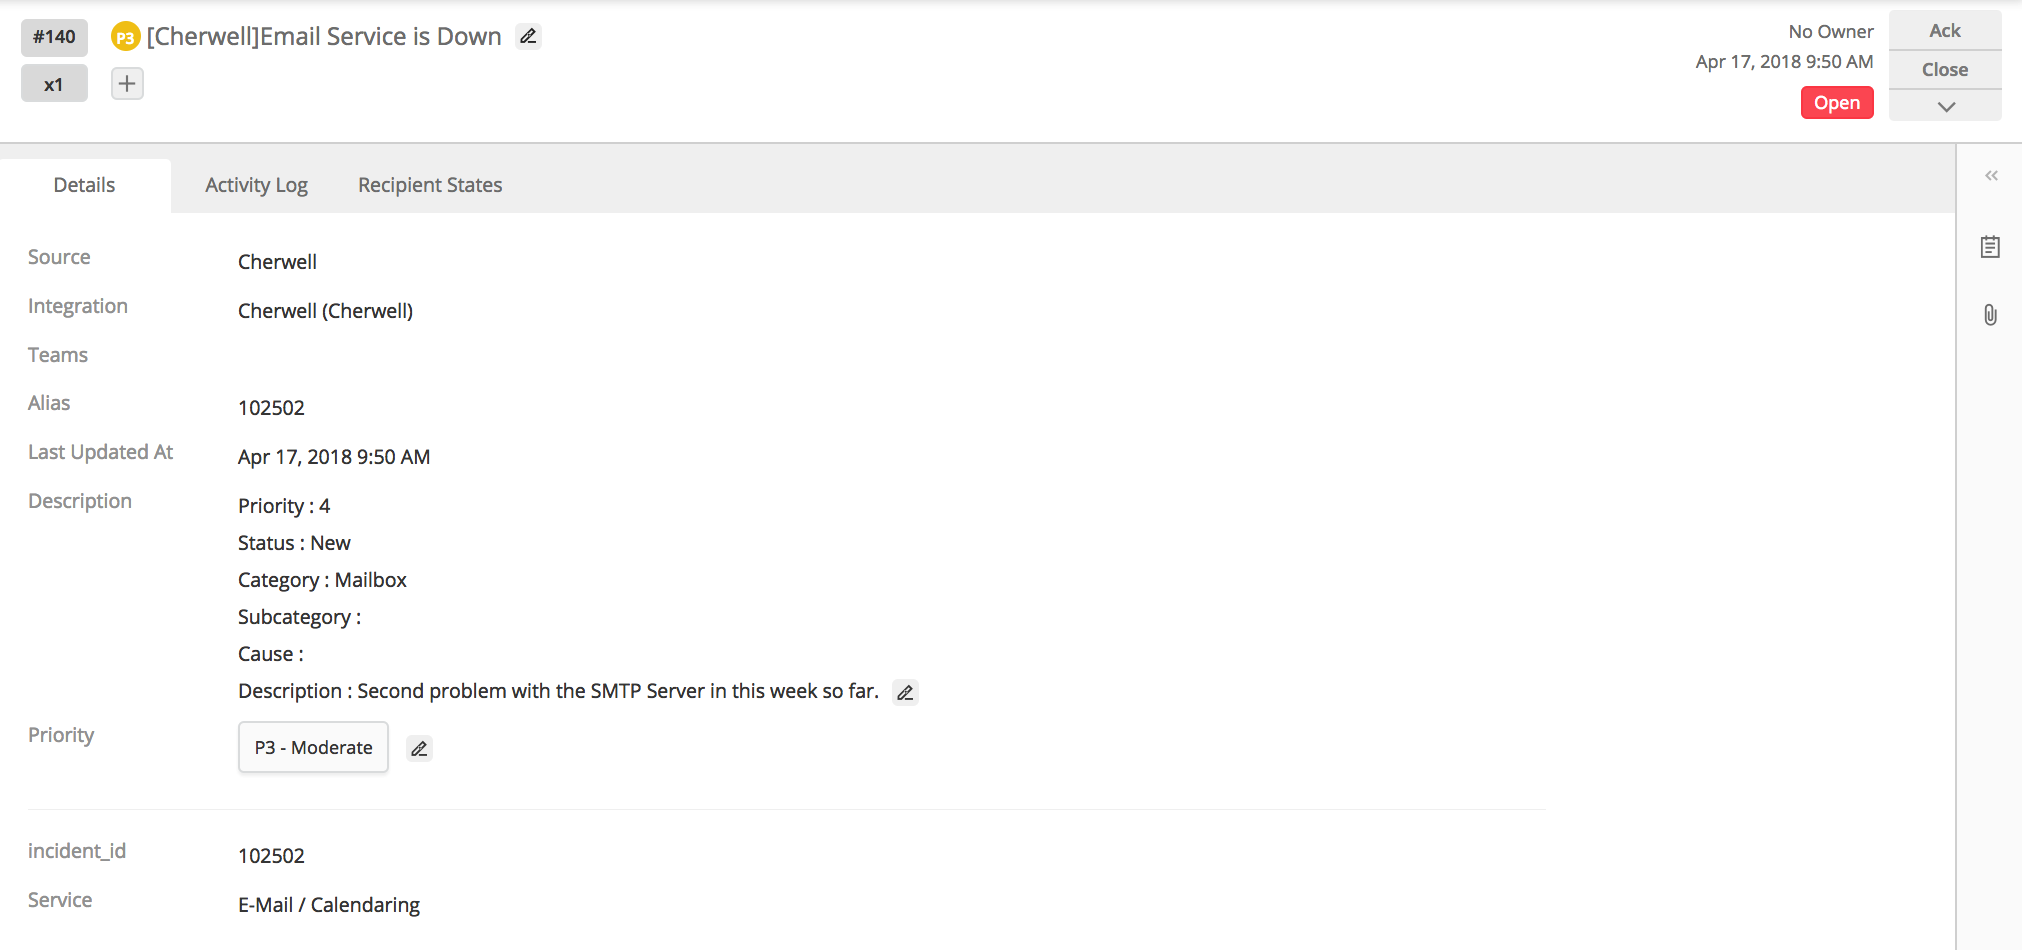
Sample Alert
Updated 7 months ago
